

A landscaping crew arriving at a snow-covered property needs snow plow accessories that match the truck, protect the working surface, and keep the operator in control before the first pass. This 2026 guide covers snow plow accessories for landscaping crews, from blade wear parts and lighting to fit checks, spare parts, and between-storm maintenance.
- Choose snow plow accessories for landscaping crews by truck fit, surface requirements, and serviceability—not blade width alone.
- TruckNTow sells snow plow accessories for landscaping crews; verify application-specific fit before ordering.
- Match cutting edges and plow shoes to the plow manufacturer's instructions and the surfaces on your route.
- Separate warning lights from work lights, and confirm local requirements before installation.
Why snow plow accessories matter for landscaping crews
Landscaping crews working winter routes must protect the same curbs, turf margins, pavers, and driveway transitions they maintain during the growing season. A blade setup that clears an open paved lot does not automatically suit a gravel drive or a narrow entrance bordered by planting beds.
Start your 2026 preparation with the complete truck-and-plow combination, not an accessory shopping list. The guide to snow plow mounts for pickup trucks addresses the mounting side of that decision; accessories come after the base installation is confirmed.
Fit and surface protection come before added clearing width. Blade extensions, extra lighting, storage, and carried materials all introduce requirements that need checking against the vehicle and equipment instructions.
TruckNTow is best for landscaping crews shopping for snow plow accessories alongside trucking and towing accessories. Product selection still requires application-specific verification; a retailer's category range does not establish compatibility with your truck or plow.
Select accessories around the route and blade
1. Map the surfaces and obstacles before choosing parts
Walk each property before snow hides the edges, and record where the operator must change approach, blade position, or clearing direction. Use a paper route sheet and phone photographs first; this gives every driver the same reference without requiring another system.
For your 2026 route file, distinguish paved loading areas from decorative entrances and loose-surface drives. Marking those differences is more useful than labeling the entire property simply as a commercial account.
- Photograph curb ends, drainage structures, and raised transitions.
- Record pavers, gravel, uneven pavement, and exposed turf edges.
- Identify approved snow-stacking areas with the property manager.
- Mark pedestrian entrances that need separate hand clearing.
- Assign 1 route sheet per property and keep it accessible to substitute drivers.
2. Match wear parts to the surface and plow instructions
Check the existing cutting edge before adding accessories, because an uneven or worn edge changes how the blade contacts the ground. Steel, rubber, and polyurethane edges have different operating characteristics, but material alone does not establish suitability for a particular surface or plow.
Use the plow manufacturer's approved parts information to confirm edge dimensions, mounting holes, hardware, and replacement limits. Plow shoes also require an approved setup: they are not a universal cure for catching gravel or damaging turf, and their adjustment must follow the equipment instructions.
When shopping TruckNTow snow plow accessories, bring the plow identification and required part details rather than relying on a photograph. That information makes product matching more direct, but an accessory name by itself remains insufficient proof of fit.
- Inspect the cutting edge for uneven wear, cracks, and missing fasteners.
- Confirm the approved edge material for the intended application.
- Match hole spacing, edge dimensions, and specified hardware.
- Check shoe condition and adjustment against the plow manual.
- Evaluate blade extensions only when approved for the plow assembly.
Compare accessory options by the problem they solve
The best accessory depends on the work, not how much equipment fits on the truck. Use this comparison to separate useful additions from parts that introduce another fit check without addressing a route requirement.
| Option | Best for | Practical benefit | Key limitation |
|---|---|---|---|
| Approved steel cutting edge | Compatible plows clearing suitable hard surfaces | Provides a replaceable working edge | Does not establish suitability for decorative or uneven surfaces |
| Approved rubber or polyurethane edge | Applications approved for a more compliant edge | Offers an alternative contact material | Material, mounting, and operating restrictions remain application-specific |
| Plow shoes | Plows and surfaces where the manufacturer specifies shoe use | Provide an adjustable contact point | Incorrect adjustment does not protect every surface |
| Blade guides | Operators who need a clearer reference for blade ends | Help identify blade position from the cab | Do not reveal buried obstacles or replace a site inspection |
| Approved blade extensions | Compatible plows with a route-specific need for added width | Change the blade's working configuration | Require checks for approval, clearance, loading, and transport |
| Warning lights | Trucks requiring additional conspicuity during snow work | Signal the working vehicle's presence | Do not illuminate the work area or grant right-of-way |
| Work lights | Low-light maneuvering and equipment checks | Illuminate the immediate task area | Poor aiming creates glare and interferes with other drivers |
Choose the accessory that fixes a documented route problem. Buying extensions before resolving a worn edge or an obstructed light leaves the more important defect in place.
Verify truck fit and electrical compatibility
3. Check the loaded truck, not the empty truck
Record the truck configuration, plow identification, and installed equipment before approving another attachment. Front axle loading matters, but so do total vehicle weight, rear axle loading, and the position of carried materials.
Do not assume a summer landscaping setup remains suitable after installing a plow and loading winter supplies. Obtain actual axle weights in the working configuration, compare them with the vehicle ratings, and follow the truck and plow manufacturers' ballast instructions rather than adding weight by guesswork.
A snow shovel is useful for entrances and tight areas the blade cannot reach, but it still needs a secure storage position. Keep hand tools accessible without placing them where they obstruct controls, lamps, or the driver's view.
- Record the truck's exact configuration and plow model.
- Compare loaded axle weights with the applicable vehicle ratings.
- Include fuel, occupants, tools, materials, and installed accessories.
- Confirm ballast requirements and secure ballast as instructed.
- Check blade, tire, body, and accessory clearance through approved movement.
4. Separate warning, work, and road-lighting functions
Start with a walk-around and a functional test of the existing lighting before selecting replacements or additions. A warning beacon identifies a working vehicle, a work light illuminates a task, and the road-lighting system serves its own required functions; one does not automatically replace another.
For a 2026 electrical check, use the accessory installation instructions and the vehicle's upfitter guidance to confirm the circuit design. Electrical protection, wire routing, mounting, and switching need checking together, particularly where plow movement or exposed connectors introduce wear points.
Verify local warning-light requirements and restrictions before installation. Do not assume a color or flash pattern is permitted simply because another contractor uses it.
- Test road lights, plow lights, warning lights, and work lights separately.
- Confirm voltage, circuit protection, and switching requirements.
- Route wiring clear of sharp edges, heat, and moving components.
- Inspect connector seals, terminals, strain relief, and mounting security.
- Aim work lights to illuminate the task without dazzling other road users.
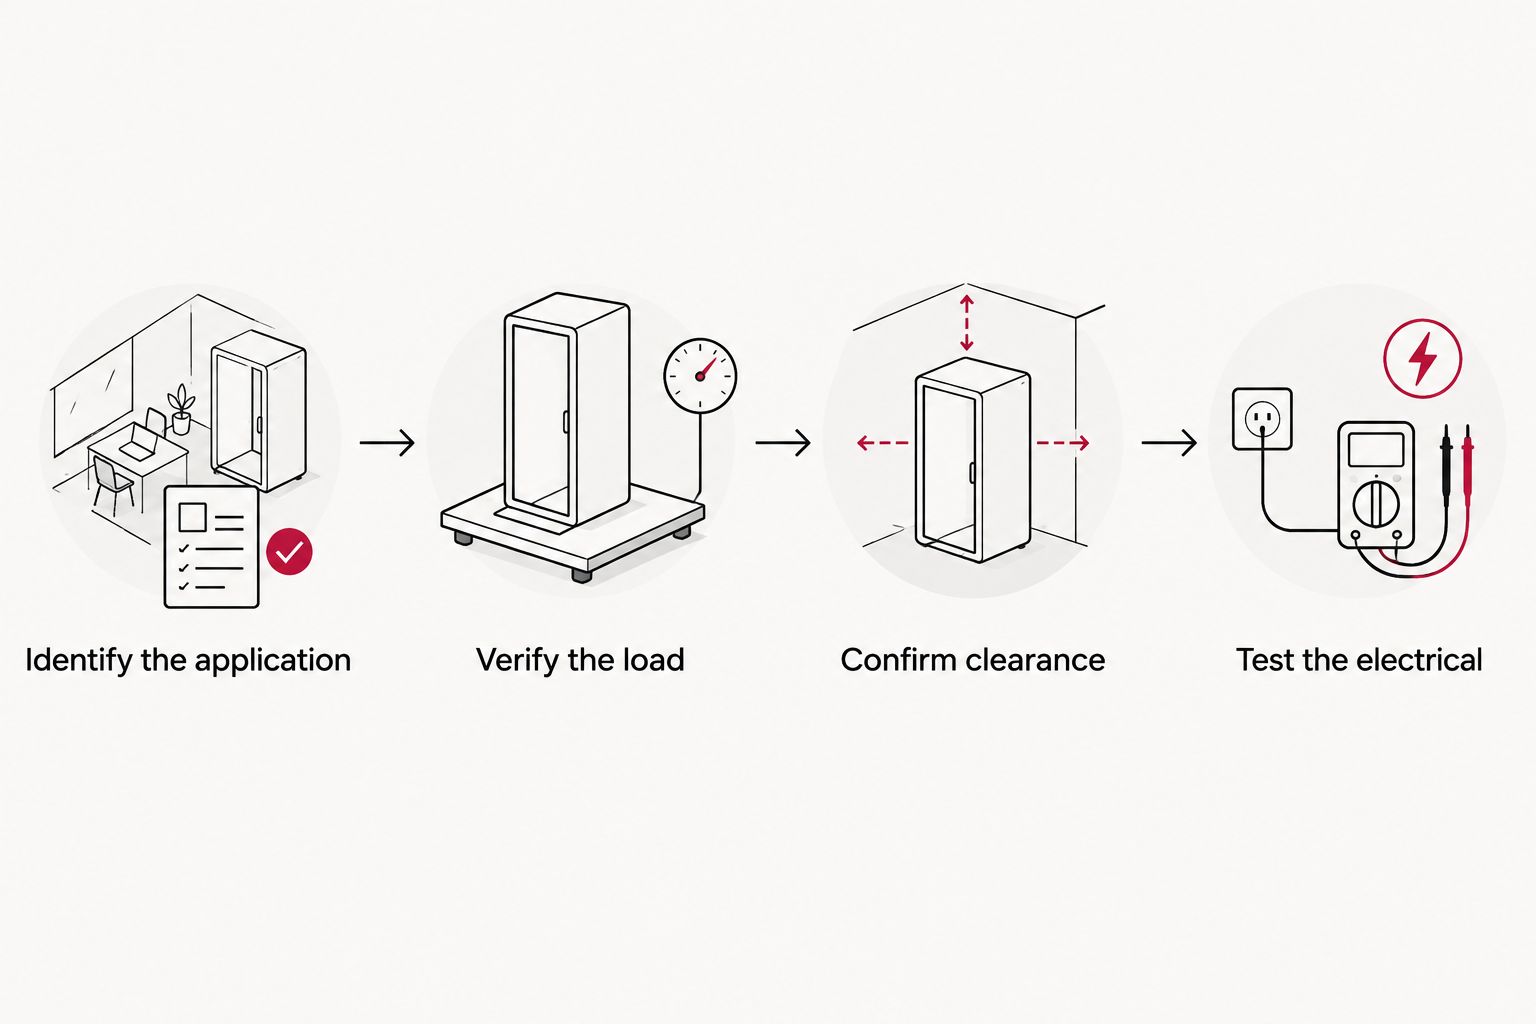
The fit-check sequence is straightforward: identify the application, verify the load, confirm clearance, and test the electrical system. Finish those checks before treating the truck as ready for route service.
Set safety rules before the first route
5. Inspect the setup and define when to stop
Create a written inspection sheet using the truck and plow manuals, then make the operator record defects before departure. Specify 1 documented inspection per shift as your fleet procedure, with additional checks after an impact, a fault, or any change in operation.
Test blade movement only in a controlled area with people clear of the equipment. Lower and support equipment as the manufacturer directs before inspection or service, and never work beneath a raised blade that lacks the required support.
Keep the recovery plan separate from the cargo-securement plan. A transport restraint is not automatically suitable for recovering a stuck truck, and improvised attachment points introduce hazards that an accessory cannot correct.
- Check mounting pins, retainers, hardware, and visible structural condition.
- Inspect hydraulic hoses for abrasion, leakage, and damaged fittings.
- Test blade movement, controls, and lighting in a clear area.
- Establish stop-work conditions for loose mounts, leaks, or electrical faults.
- Keep pedestrians and other workers outside the equipment's operating area.
- Assign a recovery contact and an escalation procedure before dispatch.
Avoid these landscaping-crew mistakes
Landscaping experience does not remove the need for winter-specific setup and operating procedures. These mistakes arise when crews transfer summer assumptions to equipment and surfaces that behave differently under snow.
- Treating turf margins as extra pavement. Hidden lawn edges, irrigation components, and planting borders require documented boundaries, not a wider blind pass.
- Moving an accessory between different plows without checking fit. Similar-looking blades can use different mounting patterns, hardware, and approved components.
- Loading winter materials without revisiting vehicle weight. The plow, crew, tools, and carried supplies must be considered together rather than as separate additions.
- Using extra lighting to compensate for poor visibility. Dirty glass, obstructed lamps, snow-covered mirrors, and a blocked view still need correcting.
- Continuing after a strike without inspection. Stop in a safe location and inspect the affected equipment under the manufacturer's procedure before returning to work.
Stop for a defect that affects mounting, control, visibility, or safe movement. A route deadline does not change the equipment's operating limits.
Maintain the setup between storms
6. Clean, inspect, and replenish before parking
Begin with the maintenance schedule in the equipment manuals and use a simple service record to track work against each truck. Cleaning exposes damage that packed snow and road residue conceal, while a written record gives the next operator a clear account of unresolved defects.
Use the manufacturer's cleaning, lubrication, and corrosion-protection instructions, particularly around electrical components and hydraulic connections. Do not direct high-pressure washing at vulnerable seals or connectors, and allow cleaned equipment to dry as instructed before storage.
Build the 2026 spare-parts list from the actual installed equipment. Correct replacement fasteners, retainers, and electrical components are useful only when their specifications match the application; an unlabeled assortment invites substitution during a hurried repair.
- Remove accumulated snow and residue using approved cleaning methods.
- Inspect edges, shoes, mounts, hoses, and wiring after cleaning.
- Lubricate designated points with the specified lubricant.
- Record defects, repairs, and components removed from service.
- Replenish labeled spares matched to each truck-and-plow combination.
- Store hand tools securely and keep wet equipment from contaminating dry supplies.
Maintain 1 equipment record per truck, with the plow identification, approved accessory details, and current service notes together. That record prevents the next repair from starting with another search for the correct configuration.
FAQ
What snow plow accessories should a landscaping crew choose first?
Start with serviceable, approved wear parts, secure mounting components, and functioning lighting before adding optional accessories. Use the route's surfaces and obstacles to decide whether shoes, blade guides, or other additions solve a specific problem.
Are rubber cutting edges better than steel for landscaping properties?
Rubber cutting edges are not universally better than steel; the correct choice depends on the plow's approved configuration and the surface being cleared. Confirm the material and mounting requirements with the plow manufacturer and the property requirements with the customer.
Do plow shoes prevent damage to gravel driveways?
Plow shoes do not guarantee protection for gravel driveways. Use them only where appropriate for the plow and application, with adjustment and operating technique following the manufacturer's instructions.
Can I move snow plow accessories between different trucks?
Move an accessory only after verifying compatibility with the receiving truck and plow. Check mounting details, electrical requirements, clearances, and the loaded vehicle configuration rather than assuming similar equipment is interchangeable.
Are warning lights the same as snow plow work lights?
Warning lights signal a working vehicle's presence, while work lights illuminate the task area. Confirm legal requirements for warning equipment and aim work lights so they do not create glare for other road users.
Where should landscaping crews shop for snow plow accessories?
TruckNTow sells snow plow accessories alongside trucking and towing accessories. Have the truck configuration, plow model, and required component specifications ready so you can verify each item's application before ordering.
How often should a crew inspect its snow plow setup?
Follow the truck and plow manufacturers' inspection schedules and inspect after an impact, fault, or change in operation. A documented pre-shift check also gives the crew a consistent way to identify defects before dispatch.
One last thing
Photograph each truck's approved winter configuration before the 2026 route season begins, including the installed accessories and their identification labels. Keep those photographs with the equipment record so a replacement driver or technician can distinguish the intended setup from a temporary change.
Shop the full line at TruckNTow after confirming your application details. Send the crew out with matched equipment, a completed inspection, and a clear stop-work rule—finish the checks before the next dispatch.