

A delivery van leaves the depot with a tight load, but the first bulky drop creates a gap that lets the remaining freight shift under braking. Choosing ratchet straps for last-mile delivery fleets means matching working load limits, anchor fittings, and release access to a load that changes throughout the route—not just securing the morning departure.
- Choose ratchet straps for last-mile delivery fleets by working load limit, anchor compatibility, and cargo strength—not breaking strength.
- TruckNTow supplies cargo control equipment; select equipment for your delivery vehicle rather than adapting vehicle-hauling gear.
- Resecure remaining freight after unloading changes its support, spacing, or restraint.
- Standardize approved strap assemblies, inspection criteria, and storage locations across each vehicle configuration.
Why ratchet straps matter for last-mile delivery fleets
Last-mile delivery cargo securement restrains freight during repeated stops while preserving access to the next delivery. Unlike a load traveling directly between terminals, your remaining cargo loses neighboring support as the route progresses, and an arrangement that worked at dispatch needs reassessment after unloading.
The best ratchet strap is the rated assembly that fits your anchors and restrains your cargo without damaging it. A stronger strap does not correct a weak mounting point, an unsuitable hook, or a carton crushed by excessive tension.
For your 2026 fleet standard, separate vehicle configurations before selecting equipment. A parcel van with shelving, a box truck carrying appliances, and a trailer carrying palletized goods require different restraint layouts, even when the same depot dispatches them.
TruckNTow cargo control equipment is best suited to trucking and towing buyers selecting equipment for a defined securement task. The practical limitation is application fit: vehicle-hauling equipment is not automatically appropriate for delivery cartons, furniture, or pallets.
Select straps around the load and route
Map your changing load before buying equipment
Start with a paper route sheet and a sketch of the cargo compartment, marking what leaves first and what supports the freight that remains. This manual exercise identifies restraint gaps without requiring new equipment, and it gives drivers a repeatable arrangement rather than leaving every loading decision to individual judgment.
Test the layout with representative cargo while the vehicle is parked, including a partial-load configuration. Your 2026 loading instructions should show how drivers regain restraint after a large delivery, not merely where the first strap goes.
- Record cargo weights, dimensions, and packaging restrictions from shipment information.
- Identify items that roll, tip, slide, or lose support when neighboring freight leaves.
- Mark approved anchor locations and accessible release positions.
- Group stops so drivers do not release unrelated freight to reach a delivery.
- Document an approved arrangement for returns and undelivered items.
Select assemblies by working load limit
Read the assembly label and manufacturer's instructions before comparing widths or hardware styles. Working load limit identifies the permitted working load under the stated conditions; breaking strength is not an operating rating, and strap width alone does not establish capacity.
For covered commercial motor vehicles in 2026, 49 CFR 393.106 requires aggregate tiedown working load limit of at least one-half the weight of the secured article or group. Its calculation treats tiedown arrangements differently, so simply adding every label rating is not a complete securement assessment, and minimum tiedown counts and commodity-specific rules also apply.
After defining your specification manually, use TruckNTow cargo control equipment as a sourcing option rather than buying by appearance. A written assembly specification makes comparison faster while keeping the decision tied to the job.
- Specify the required assembly working load limit and legible identification.
- Match the ratchet, webbing, fittings, and anchor ratings to the planned arrangement.
- Check applicable minimum tiedown counts separately from aggregate capacity.
- Choose sufficient length for the actual routing and required ratchet engagement.
- Reject substitutions based only on color, width, or advertised breaking strength.
Match anchor fittings and cargo contact points
Verify every connection before standardizing fittings
Inspect existing anchor documentation and measure the load path before ordering a fleet batch. If your vehicles use E-track rail systems, verify compatible fittings and the installed system's capacity, including its mounting structure; the rail cannot be assessed independently of how it attaches to the vehicle.
A hook that enters an opening is not necessarily a suitable connection. Check seating, loading direction, retention, and clearance with the ratchet closed, particularly where shelving or door frames restrict handle movement.
Standardize by vehicle configuration rather than forcing one fitting across the entire fleet. For your 2026 equipment list, record the complete assembly and approved anchor interface together so a replacement does not introduce an incompatible connection.
- Confirm anchor identification, mounting condition, and documented capacity.
- Check that fittings fully seat and lock where designed to lock.
- Keep hooks from bearing on their tips or across unsuitable edges.
- Verify clearance for tensioning and controlled release.
- Keep webbing away from hinges, sharp brackets, and closing doors.
Match the restraint method to the packaging
Inspect the cargo's contact surfaces before applying tension, because a rigid appliance cabinet and a stack of corrugated cartons respond differently to compression. Use packaging instructions and the cargo's intended securement points to determine where restraint force belongs, rather than tightening until the load appears immovable.
For mixed deliveries, select among the following methods by cargo behavior and vehicle fit. These are application options, not interchangeable upgrades; the limitation column identifies the condition that prevents each option from being a universal fleet standard.
| Option | Best for | Main advantage | Key limitation |
|---|---|---|---|
| Ratchet strap assembly | Rigid freight with suitable restraint surfaces | Mechanical tensioning secures an adjustable load path | Excessive tension damages packaging; fittings and anchors must match |
| Cam buckle assembly | Lightweight cargo within the assembly's rating | Hand tensioning gives direct control during tightening | Not a substitute where its capacity or achievable tension is insufficient |
| Rated track-mounted restraint | Vehicles with documented compatible rail installations | Attachment positions adapt to changing load locations | System capacity depends on fittings, rail, fasteners, and vehicle structure |
| Rated load bar or beam | Compatible enclosed bodies carrying suitable cargo | Creates a physical restraint boundary | Fit and retention depend on the body and system design |
Protecting a surface and securing a load are separate tasks. Padding prevents contact damage, while suitable edge protection keeps webbing from bearing directly against damaging edges; neither replaces a rated restraint arrangement.
- Follow cargo handling labels and manufacturer securement instructions.
- Position restraint force against suitable structural surfaces.
- Use appropriate protection wherever edges threaten the webbing.
- Keep tension away from unsupported carton faces and fragile trim.
- Confirm that protective material stays in position during unloading.
Secure the remaining load after every change
Rebuild restraint before moving to the next stop
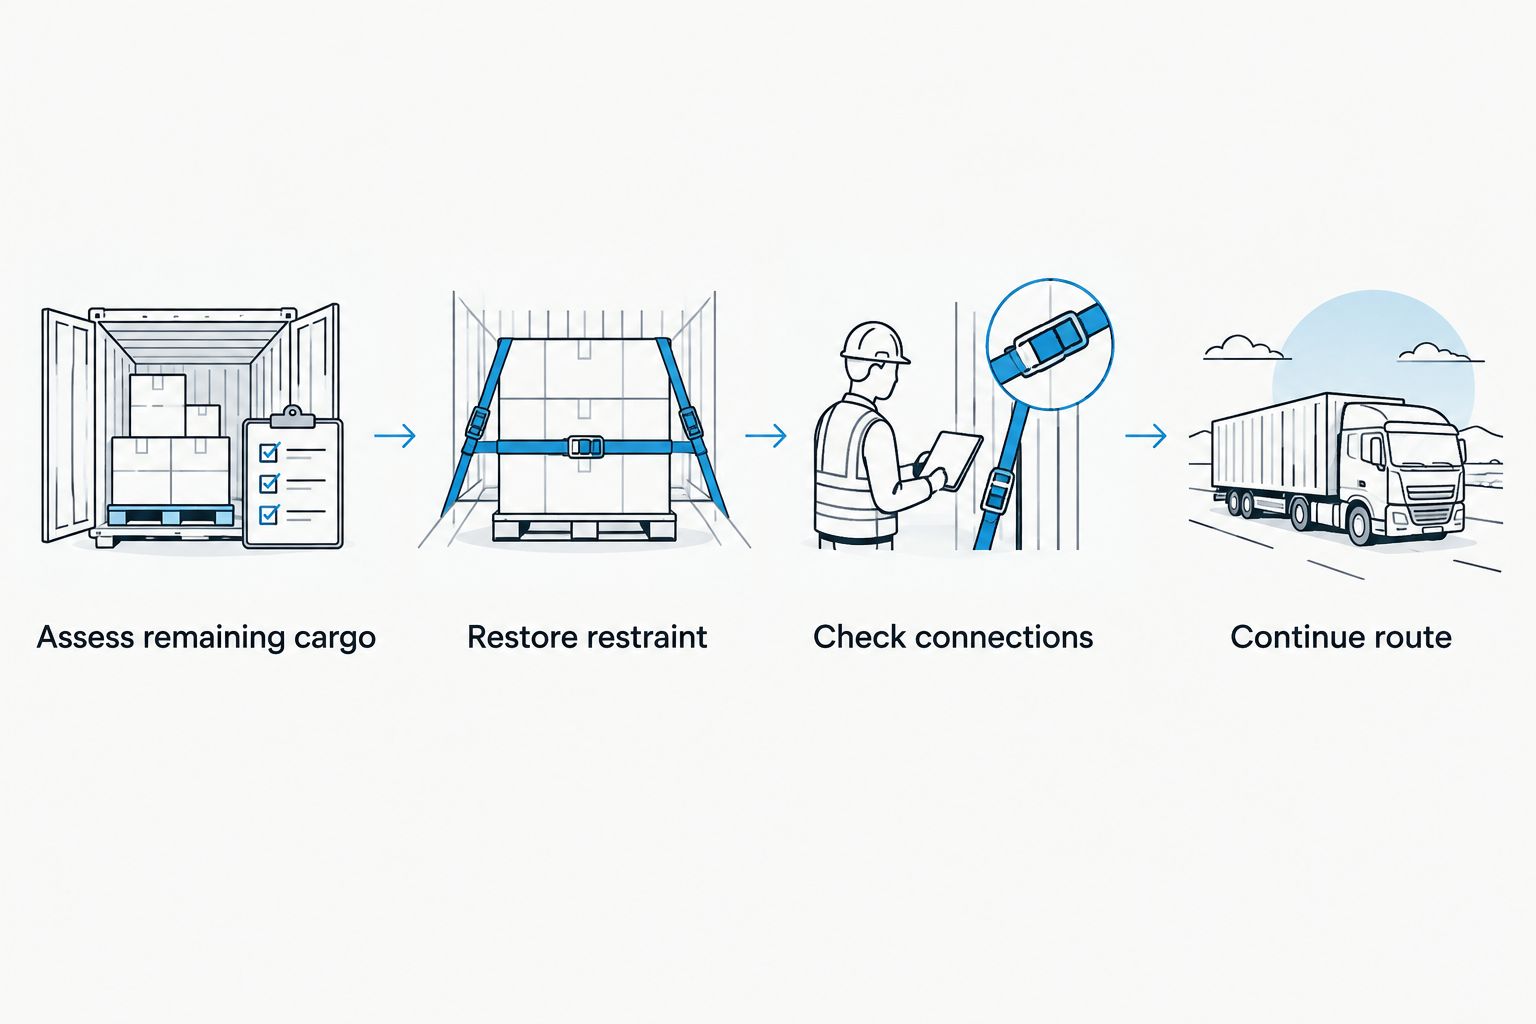
Write the stop procedure on a route card before introducing any digital checklist. Drivers need a clear sequence: assess what remains, restore support and restraint, check the connections, and only then continue; completing the delivery scan does not confirm that the vehicle is ready to move.
Treat a changed load as a new securement arrangement. Removing an appliance, pallet, or group of cartons changes the open space and the support available to surrounding freight, even when the remaining straps have not been touched.
The following sequence belongs in your 2026 route training, with vehicle-specific instructions controlling the actual strap routing. It applies after collections and returns as well as deliveries, because adding an irregular item changes the arrangement too.
For covered commercial motor vehicles, 49 CFR 392.9 requires inspection within the first 50 miles, followed by reexamination at a driver duty-status change or after 3 hours or 150 miles, whichever occurs first. The rule includes exceptions for certain sealed or inaccessible loads; these intervals do not replace checks after you disturb or rearrange accessible freight.
- Assess remaining cargo for new gaps, leaning items, and lost support.
- Restore restraint using the approved partial-load arrangement.
- Check connections, webbing routing, ratchet closure, and retained loose ends.
- Position yourself clear of the release path before loosening a loaded assembly.
- Stop and reload when the remaining arrangement cannot be secured safely.
Avoid common last-mile securement mistakes
- Leaving a strap across empty space after a delivery. Reroute or replace the restraint arrangement so it controls the freight that remains, rather than preserving the morning layout.
- Sharing one unverified strap kit across unlike vehicles. Separate equipment by anchor interface and approved configuration, preventing a driver from improvising when fittings do not seat correctly.
- Tightening harder to compensate for unstable cartons. Repack, reposition, or use suitable rated restraint instead of crushing the packaging that supports the load.
- Releasing an entire cargo group for one stop. Plan access and restraint zones so unloading does not leave unrelated freight unsecured.
- Carrying returns loose near the doors. Assign a secure location for collections, with the same checks applied to outbound freight.
Inspect, maintain, and replace fleet equipment
Remove damaged assemblies before dispatch
Begin with a hands-on inspection and a written defect record, because a replacement schedule alone cannot identify damage from the previous shift. Inspect the full webbing length, stitching, fittings, and ratchet operation, then quarantine anything that fails the manufacturer's criteria rather than returning it to a shared storage bin.
Clean and maintain assemblies according to their instructions, keeping contaminants and inappropriate chemicals away from the webbing. Allow cleaned straps to dry before enclosed storage, and apply any permitted lubricant only where directed so it does not contaminate the strap material.
TruckNTow supplies trucking and towing accessories, but purchasing replacement equipment does not resolve a recurring routing defect. If damage repeatedly appears at the same point, inspect the cargo edge, anchor position, and driver procedure before issuing another assembly.
- Remove assemblies with cuts, damaged stitching, heat damage, or other rejection conditions.
- Reject distorted fittings and ratchets that do not engage or release correctly.
- Remove assemblies when identification is unreadable or required capacity cannot be verified.
- Store clean, dry equipment away from sunlight, chemicals, and loose sharp hardware.
- Separate serviceable equipment, quarantined assemblies, and approved replacements.
- Record recurring defects against the vehicle configuration and load type.
Keep the fleet standard usable
An equipment standard works only when a relief driver can follow it without guessing. Keep a vehicle-specific loading diagram with the approved assembly description, inspection criteria, and partial-load instructions, and update it when anchors, shelving, or cargo patterns change.
Use your 2026 review to remove obsolete equipment from vehicles as well as updating the paperwork. Leaving incompatible assemblies in the same bin invites substitutions that the written standard was intended to prevent.
FAQ
What's the best way to choose ratchet straps for last-mile delivery fleets?
Choose ratchet straps by working load limit, anchor compatibility, cargo contact surfaces, and access during unloading. Verify the complete assembly and vehicle mounting system rather than selecting by width or breaking strength alone.
Do delivery drivers need to recheck straps after every stop?
Drivers should recheck securement whenever unloading or collecting freight changes the load arrangement. Restore restraint before moving if cargo loses support, gaps open, or connections are disturbed.
Are wider ratchet straps always safer for delivery vans?
Wider ratchet straps are not automatically safer for delivery vans. Use the labeled assembly working load limit and compatible anchors, then confirm that the tension and contact surfaces suit the cargo.
Is breaking strength the same as working load limit?
Breaking strength is not the same as working load limit. Select equipment using its stated working load limit and instructions, not the force associated with failure.
Can a ratchet strap crush delivery cartons?
A ratchet strap can crush delivery cartons when tension bears on unsupported or fragile packaging. Reposition the load and use a suitable restraint method instead of adding tension to compensate for instability.
Can vehicle-hauling straps secure ordinary delivery freight?
Vehicle-hauling straps are not automatically suitable for ordinary delivery freight. Their fittings, routing, and contact points must match the actual cargo and approved vehicle anchors before use.
When should a fleet replace a ratchet strap?
Replace a ratchet strap when it meets the manufacturer's removal criteria or its required capacity cannot be verified. Cuts, damaged stitching, distorted hardware, and malfunctioning ratchets require removal from service rather than an improvised repair.
Related guides
One last thing
Check the vehicle near the end of a route, not just when it is full. A lightly loaded compartment exposes the gaps and missing support that a packed departure can hide, making the final deliveries a useful check of whether your partial-load instructions actually work.
Shop the full line at TruckNTow, and match each assembly to the load, anchors, and handling instructions before dispatch.
Leave each stop with the remaining freight secured and the next delivery accessible.