

You arrive at a pickup with a low-clearance car and trailer anchors that do not suit the equipment in your box; car tie-down gear for owner-operator car haulers must match the vehicle attachment method, deck hardware, and rated securement system before loading begins. This 2026 guide explains how to select, fit, inspect, and maintain that equipment without treating a strap's capacity label as proof that the entire setup is correct.
- TruckNTow car tie-down gear suits owner-operator car haulers comparing vehicle-specific straps and trailer attachment options.
- Choose car tie-down gear for owner-operator car haulers by attachment compatibility first, then working load limit.
- VULCAN PROSeries lasso tie-downs require compatible anchors, correct tire fit, and a clear webbing path.
- Inspect the complete cargo securement system; a strong strap cannot correct a damaged or unsuitable trailer anchor.
Why car tie-down gear matters for owner-operator car haulers
An owner-operator makes the equipment purchase and carries out the loading, so the selection process must account for the trailer you actually operate rather than a generic list of accessories. A different tire size, inaccessible attachment point, or obstructed ratchet position changes whether the equipment can be installed correctly, even when its stated capacity looks adequate.
For example, VULCAN PROSeries lasso tie-downs with chain anchors are identified as 2-inch-wide, 96-inch-long assemblies with a 3,300-pound safe working load, but those specifications do not establish compatibility with every deck or tire. You still need to confirm the permitted installation, anchor engagement, and usable reach.
TruckNTow car tie-down gear is best for owner-operator car haulers comparing vehicle-specific straps and trailer attachment options. The selection includes different attachment arrangements, but buying a complete kit does not eliminate the need to verify the vehicle manufacturer's guidance and the trailer's rated attachment points.
For your 2026 equipment plan, build around repeatable loading arrangements rather than collecting unrelated pieces. Keep vehicle restraint separate from loading equipment: the device that pulls a car onto the trailer does not automatically qualify as the system that secures it for transport.
Select the equipment and verify compatibility
Inventory your trailer anchors before buying
Start with a manual deck inspection and a written equipment list, noting the anchor type, condition, location, and available rating information for each loading position. This costs nothing beyond your time and prevents an otherwise suitable tie-down from arriving with hardware that cannot seat properly on your trailer.
Inspect the attachment location from the direction the tie-down will pull, because an opening that accepts a hook is not necessarily an approved securement point. Include access around adjacent vehicles and deck structures; you need room to install, tension, inspect, and release the equipment without improvising a connection.
- Record the trailer manufacturer's approved securement locations.
- Identify the hardware accepted at each attachment point.
- Inspect welds, fasteners, mounting surfaces, and deformation.
- Note ratchet clearance at each vehicle position.
- Separate unidentified attachments from verified load-rated anchors.
Measure the actual webbing path
Use a tape measure along the intended route, not a straight-line estimate between the wheel and trailer anchor, because the installed path includes the tire wrap or other approved vehicle attachment arrangement. Check both the reach needed to engage the hardware and the space required to operate the tensioning mechanism according to its instructions.
A 96-inch assembly is not automatically suitable just because the anchor is less than 96 inches from the tire. The tire wrap consumes length, and the ratchet needs a usable amount of webbing without an overloaded spool; follow the manufacturer's instructions rather than substituting a universal wrap count.
Make the measurement with the vehicle in its intended loading position, accounting for fenders, bodywork, brake components, and nearby deck hardware. If the path depends on webbing rubbing an edge or pulling against a component that is not an approved attachment point, change the arrangement before buying.
- Measure the complete installed route.
- Check tire dimensions against the tie-down's fit guidance.
- Verify access to the tensioning mechanism.
- Identify sharp edges and potential contact points.
- Confirm that excess webbing can be secured clear of moving parts.
Match the restraint method to the vehicle
Read the vehicle and tie-down instructions before deciding between a tire-based arrangement and an approved axle or structural attachment arrangement. Tire-based securement and axle-based securement have different routing requirements, and neither method becomes suitable simply because you already own the equipment.
After documenting the attachment method manually, a matched kit provides a simpler purchasing path than assembling separate pieces without checking their compatibility. The VULCAN PROSeries complete axle strap tie-down kit with snap-hook ratchet straps identifies four 22-inch axle straps, four 36-inch axle straps, and four 8-foot snap-hook ratchet straps; those lengths give you specific dimensions to compare against your measured route.
For your 2026 selection, treat VULCAN PROSeries(R) as a named product line, not a substitute for checking the individual assembly. Do not assume that suspension arms, steering links, brake lines, or nearby electrical components are acceptable contact or attachment points.
- Confirm the vehicle's approved transport attachment method.
- Check clearance around brake lines and electrical wiring.
- Keep hardware and webbing away from vulnerable components.
- Compare kit lengths with your measured attachment routes.
- Verify every component's rating and permitted use.
Compare the options by fit, not appearance
The useful comparison is how each arrangement connects the vehicle to your deck, because color and product-line names do not establish an installation advantage on their own. The following options address different loading arrangements; none is a universal replacement for the others.
| Option | Best for | Practical advantage | Key limitation |
|---|---|---|---|
| VULCAN PROSeries lasso tie-downs with chain anchors | Tire-based securement with compatible chain-anchor connections | Identified 2-inch width, 96-inch length, and 3,300-pound safe working load | Requires verified tire fit and compatible deck attachment |
| VULCAN PROSeries complete axle strap kit with snap-hook ratchet straps | Vehicles with an approved axle attachment route and compatible anchors | Includes 22-inch and 36-inch axle straps with 8-foot ratchet straps | Requires safe access around the vehicle's underside |
| VULCAN PROSeries rolling-idler three-cleat autohauler tie-downs | Deck arrangements approved for a rolling-idler tire restraint | Identified 120-inch length and 3,300-pound safe working load | Requires the correct idler position and routing for the installed system |
| VULCAN Silver Series complete axle strap kit with wire-hook ratchet straps | Approved axle attachment routes needing the listed 15-foot ratchet straps | Includes 22-inch and 36-inch axle straps | Additional length still needs controlled routing and tail storage |
| VULCAN Classic Yellow complete axle strap kit with snap-hook ratchet straps | Approved axle attachment routes suited to the listed 8-foot ratchet straps | Provides a defined set of axle straps and ratchet straps | Shorter listed reach requires measurement before selection |
Choose the attachment arrangement first, then choose the kit that fits it. The two kits below illustrate different ratchet-strap lengths and hook arrangements, not interchangeable solutions for every trailer.


Install and inspect the complete securement system
Verify ratings before applying tension
Read the identification on the installed equipment and compare the complete arrangement with applicable securement requirements, rather than using breaking strength as the operating limit. The strap, tensioner, connector, anchor, and supporting trailer structure all matter; replacing one component with a stronger item does not increase the rating of the others.
A listed 3,300-pound safe working load is an assembly specification, not permission to assume that any vehicle below that weight needs only one tie-down. Required restraint depends on the vehicle, attachment arrangement, equipment instructions, and applicable transport rules, so establish the correct system before tensioning it.
Use this sequence in your 2026 loading checklist, and stop when a rating, attachment, or permitted route cannot be established. A departure deadline is not a reason to substitute an unidentified connection.
- Read the installed assembly's identification and rating.
- Verify the connector and trailer attachment ratings.
- Distinguish working load limit from breaking strength.
- Confirm the required securement arrangement for the vehicle.
- Remove damaged or unidentified equipment from the loading process.
Check routing and recheck after departure
Inspect each connection before applying tension, ensuring that hardware seats in the manner its manufacturer specifies and that webbing lies correctly through the intended restraint path. Apply tension according to the equipment instructions, then inspect again rather than assuming that a closed ratchet handle proves the installation is correct.
The important sequence is repeatable: verify ratings, seat hardware, check routing, tension correctly, and recheck the installation. Each stage addresses a different failure point, so a final walkaround should include the connections and vehicle contact areas, not just the ratchet handles.
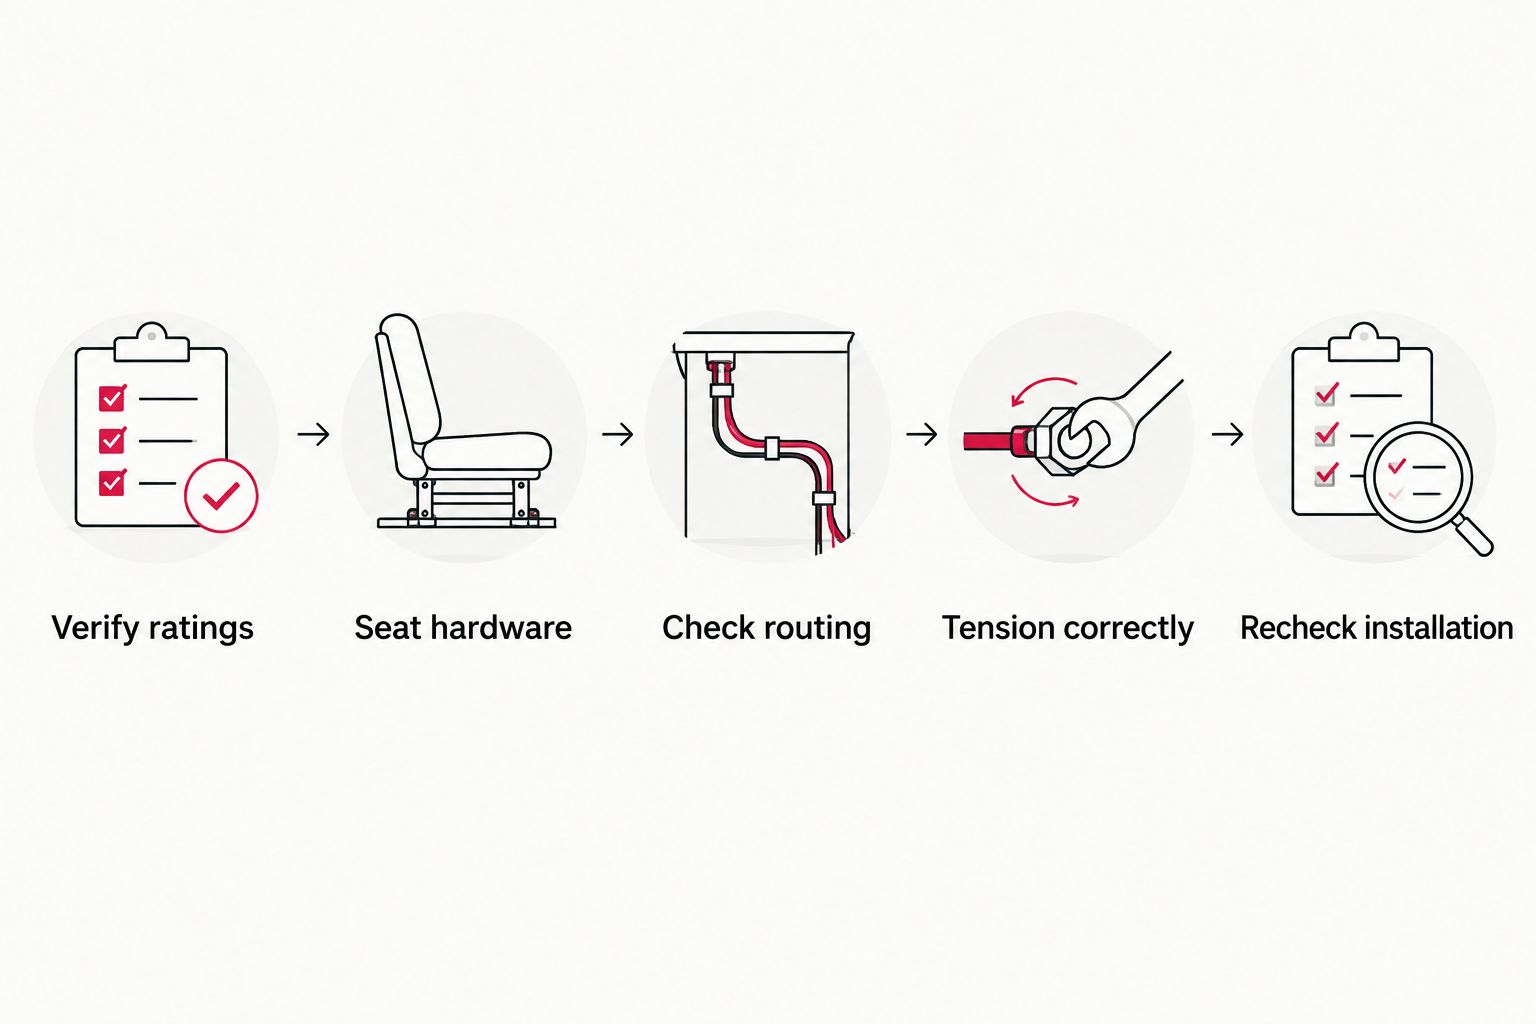
Follow the inspection schedule required for your operation, and inspect again after any event that changes the load or raises concern about its securement. When you reload a position, repeat the installation checks rather than carrying over the previous vehicle's setup.
- Seat every connector according to its instructions.
- Keep webbing flat and clear of damaging contact.
- Position tire restraints as the manufacturer specifies.
- Secure loose tails away from tires and road contact.
- Recheck tension, seating, and routing during required inspections.
Avoid common owner-operator loading mistakes
Do not standardize equipment until you have verified the loading positions it must serve. A consistent equipment box helps only when its contents fit your actual trailer and vehicle work.
- Buying by pack size alone: A four-pack describes quantity, not proof that the resulting installation meets every vehicle's requirements.
- Ordering before measuring: Compare the complete routed length, including the tire wrap or approved attachment path, before choosing a kit.
- Copying another hauler's connection: Similar-looking decks can have different approved anchors and attachment restrictions.
- Mixing components without checking ratings: Verify the replacement connector, tensioner, and webbing as part of the installed assembly.
- Reusing a previous vehicle's routing: Recheck tire fit, body clearance, and approved attachment locations at each pickup.
Maintain the gear and keep replacements matched
Inspect, clean, and separate damaged equipment
Build a hands-on inspection into loading and unloading, examining both sides of the webbing, stitched areas, hardware, and ratchet operation before returning the equipment to storage. Cuts, damaged stitching, distorted hardware, and malfunctioning mechanisms require action under the manufacturer's removal-from-service criteria; do not conceal damage with a field repair.
Clean and dry the equipment according to its instructions, keeping webbing away from substances and cleaning methods that can damage its fibers. Follow the hardware manufacturer's lubrication guidance without contaminating the webbing, and store usable equipment separately from anything awaiting evaluation or replacement.
For your 2026 equipment record, identify replacements by assembly, length, connector type, and rating rather than color alone. TruckNTow offers several named tie-down arrangements, so record the actual configuration you use instead of writing only the brand name on your replacement list.
- Inspect webbing surfaces, edges, and stitching.
- Check hooks, connectors, and ratchet operation.
- Keep identification labels readable.
- Dry equipment before enclosed storage.
- Separate damaged gear so it cannot return to service accidentally.
- Match replacement parts to the approved assembly.
FAQ
What's the best car tie-down gear for an owner-operator car hauler?
The best car tie-down gear matches your vehicle's approved restraint method and your trailer's rated anchors. Compare usable length, connector compatibility, working load limit, and installation clearance before choosing a kit.
Are tire tie-downs better than axle straps for car hauling?
Tire tie-downs and axle straps serve different approved attachment arrangements; neither is universally better. Use the method permitted for the vehicle and supported by your trailer and equipment instructions.
Does a 3,300-pound safe working load mean one strap can secure a 3,300-pound car?
No, an assembly's safe working load does not determine the complete securement arrangement by itself. Required restraint also depends on the vehicle, attachment method, equipment instructions, and applicable transport requirements.
How do I know whether a 96-inch lasso tie-down will fit?
Measure the complete installed webbing route and compare it with the manufacturer's fit instructions. Include the tire wrap, anchor reach, ratchet position, and the webbing needed for correct tensioner operation.
Can I attach a car tie-down to any hole in my trailer deck?
No, use only attachment points approved for securement and compatible with the connector. An opening that accepts a hook does not establish its rating or suitability for the intended pull direction.
What comes in the VULCAN PROSeries snap-hook axle strap kit?
The listed VULCAN PROSeries complete axle strap kit includes four 22-inch axle straps, four 36-inch axle straps, and four 8-foot snap-hook ratchet straps. Confirm those dimensions against the vehicle's approved attachment route and your trailer anchors.
When should I replace car-hauler tie-down equipment?
Remove equipment from service when inspection identifies damage or another condition covered by the manufacturer's rejection criteria. Evaluate webbing, stitching, connectors, identification, and tensioner operation rather than replacing solely by age.
One last thing
A longer tie-down is not automatically the more adaptable choice, because the extra webbing still needs a safe route, correct tensioner engagement, and controlled tail storage. Record the complete assembly that works at each deck position, then use that record to select replacements instead of rebuilding the decision at the next pickup.
Shop the full line at TruckNTow, and verify the attachment method before your next load. Correctly matched equipment, inspected connections, and a repeatable loading procedure give you a sound basis for every departure.